Đặt ip static raspberry
/etc/network/interfaces
auto lo
iface lo inet loopback

auto eth0
iface eth0 inet static
address 192.168.2.69
netmask 255.255.255.0
network 192.168.2.0
broadcast 192.168.2.255
gateway 192.168.2.1

auto wlan0
allow-hotplug wlan0
iface wlan0 inet manual
wpa-conf /etc/wpa_supplicant/wpa_supplicant.conf

auto wlan1
allow-hotplug wlan1
iface wlan1 inet manual
wpa-conf /etc/wpa_supplicant/wpa_supplicant.conf
|
Cài đặt các gói sau để có thể cài nagios
Nagios needs a web server running PHP, the GNU build tools and the GD Graphics Library.
sudo apt-get install apache2 php5 libapache2-mod-php5 build-essential libgd2-xpm-dev
|
Tạo tài khoản và nhóm
We need a user ‘nagios’ and a group ‘nagcmd’ for allowing commands over the web interface. The Apache user (www-data) needs to be added to this group too.
sudo useradd -m -s /bin/bash nagios
sudo groupadd nagcmd
usermod -a -G nagcmd nagios
usermod -a -G nagcmd www-data
|
Optionally set a password for the ‘nagios’ user:
sudo passwd nagios
|
Download Nagios theo link dưới và giải nén
At the time of this writing Nagios is at version 4.1.1 and the plugins are at 2.2.1.
wget http://prdownloads.sourceforge.net/sourceforge/nagios/nagios-4.1.1.tar.gz
wget http://nagios-plugins.org/download/nagios-plugins-2.1.1.tar.gz
tar zxvf nagios-4.1.1.tar.gz
tar zxvf nagios-plugins-2.1.1.tar.gz
|
Cài đặt nagios
Build the required targets and install Nagios in /usr/local/nagios/ .
cd nagios-4.1.1
./configure --with-command-group=nagcmd
make all
sudo make install{,-init, -commandmode, -webconf}
sudo make install install-config
|
| Tạo tài khoản nagiosadmin và đặt password để truy cập vào web interface |
Reload Apache:
sudo /etc/init.d/apache2 reload
|
Cài đặt plugins
Change to the plugin sources directory. Build and install all plugins.
cd ../nagios-plugins-2.1.1
./configure --with-nagios-user=nagios --with-nagios-group=nagios
make
sudo make install
|
Khởi động nagios
Create a symbolic link as an rc hook to run Nagios on system startup (is rcS.d truly the best place?):
ln -s /etc/init.d/nagios /etc/rcS.d/S99nagios
|
Kiểm tra cài đặt
Check if all is well with your Nagios configuration:
sudo /usr/local/nagios/bin/nagios -v /usr/local/nagios/etc/nagios.cfg
|
Start the Nagios service:
sudo /etc/init.d/nagios start
|
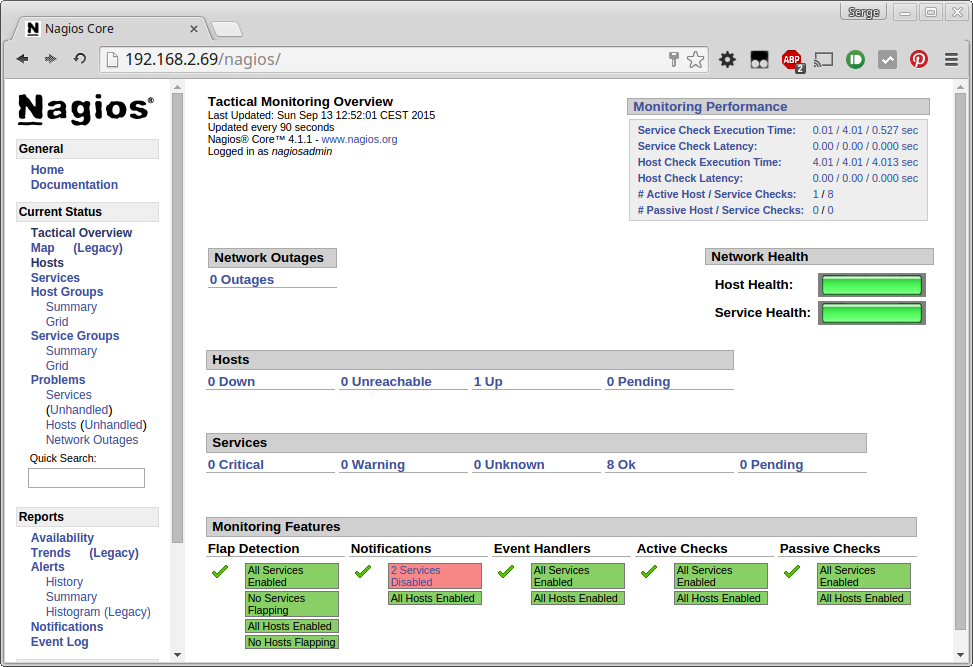
Log in to the web interface. (Of course, use the IP address or hostname of your Raspberry Pi.) In my example I surf to: http://192.168.2.69/nagios

Cấu hình Nagios
Create a directory:
cd /usr/local/nagios/etc
sudo mkdir conf.d
sudo chown nagios conf.d
|
Add this line to nagios.cfg:
cfg_dir=/usr/local/nagios/etc/conf.d
|
We have a Raspberry Pi running a web server at 192.168.2.10. We want to check if it’s reachable and if the HTTP port is available:
/etc/local/nagios/etc/conf.d/raspberrypi.cfg:
define host {
        use                     linux-server
        host_name               raspberrypi
        address                 192.168.2.10
        hostgroups              linux-servers
        notification_period     24x7
        }

define service {
        use                     local-service
        host_name               raspberrypi
        service_description     PING
        check_command           check_ping!100.0,20%!500.0,60%
        }

define service{
        use                     local-service
        host_name               raspberrypi
        service_description     HTTP
        check_command           check_http
        }
Bây giờ kiểm tra cấu hình mới :
sudo /usr/local/nagios/bin/nagios -v /usr/local/nagios/etc/nagios.cfg
|
Restart Nagios:
sudo /etc/init.d/nagios restart
|
Tag:Cài Nagios trên Raspberry
